Sizing is one of secondary operations in powder metallurgy (PM). It re-presses the sintered parts to achieve higher accuracy.

Why do that?
This is because during sintering process, the product undergoes size changes due to thermal expansion and contraction. Another reason is that the parts require high tolerance precision, which cannot be attained in one go.
In this blog, we’ll dive into the detailed process of sizing in powder metallurgy.
Contents
What is Powder Metallurgy?
Powder metallurgy is a manufacturing process that uses metal powders to produce precise and complex parts with minimal machining. The powder metallurgy process consists of four steps: powder mixing, compaction, sintering, and often a secondary operation such as sizing or heat treatment.
Unlike traditional methods such as casting or forging, PM allows manufacturers to produce near-net-shape components with high material utilization (over 95%), tight tolerances, and cost efficiency. It is widely used in the automotive, aerospace, industrial, and power tool industries to produce components like gears, bushings, structural parts, and filters with consistent quality.
Steps of Sizing Process
Sizing in powder metallurgy includes the following steps:
Pre-sizing
Start by fully inspecting each powder metallurgy part after sintering and pick out those not unqualified.
Then, for more precise external or internal measurements, consider using a micrometer. Or, you can apply a height gauge to measure critical dimensions.

Die Design and Maintenance
Die materials for sizing process are usually employed high-strength tool steels, such as AISI 4140, C 11, or CPM-10V, which offer high wear resistance and toughness. The chosen material often undergoes heat treatment processes to strength hardness and resistance.
Your powder metallurgy tooling design should match the final dimensions and tolerances of the sintered product. Make sure to consider material properties like shrinkage and springback.
Your die design should also include features that make it easy to remove the sintered components from the mold. It helps minimize damage to both the parts and the die. Also, ensure proper venting to allow air to escape during sizing process.
To prolong the life of the die, you can take the following measures:
- Clean the die surface regularly.
- Utilize lubricants to prevent metal powders from sticking
- Applying protective coatings such as titanium nitride can enhance surface hardness and corrosion resistance
Sizing
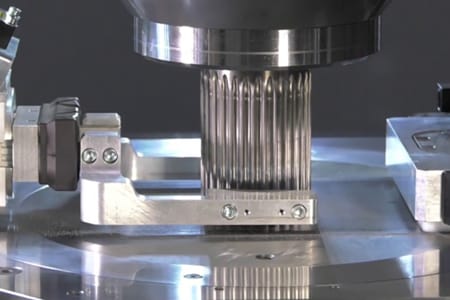
First, place the product that need sizing into the die. Start the press, and apply vertical pressure to the product through the upper punch.
Under this pressure, the product’s surface layer deforms, filling the mold cavity and sealing surface pores. Once the pressing is complete, the lower punch pushes the product from die. The product is then removed.
You can choose between fully automatic and semi-automatic presses for sizing. Generally, a fully automatic shaping press operates at a rate of 10-20 pieces per minute. The maximum pressures of these presses range from tens to hundreds of KN. Their tonnage ranges from tens to hundreds of tons.
The applied pressure is usually lower than that used in compaction process. And it’s important to ensure it’s not so high as to damage the die. Besides, sizing time is generally short, often only a few seconds. This is enough to make the adjustments to the parts without causing damage or undue stress.
Quality Control
- Dimensional Inspection
Once sizing process is complete, inspect sizing dimensions of the product. This is done to ensure that it meets the specified dimensions, surface quality and mechanical properties.
To do this, tools such as micrometers and coordinate measuring machines (CMM) are used. If the product does not satisfy the accuracy requirements, secondary sizing process or CNC machining process is necessary.
- Surface Finish Check
You can visually inspecting the cracked part. These parts may produce defects due to excessive pressure during sizing process.
Benefits of Sizing Process
Improve Dimensional Accuracy
- Tighter tolerances
Generally, parts after sintering process can reach an accuracy of about 0.04 to 0.03mm. Higher precision can be achieved through sizing, even reaching an accuracy of 0.01mm.
- Lower dimensional variations
Sizing reduces the range of dimensional variation, making the product more closely match the standard dimensions.
- Higher Consistency Throughout Entire Batch
In addition, sizing promotes parts produced in different batches maintain uniform dimensions and properties. This is conducive to the stability of finished product performance. It can also slightly boost the mechanical strength of the part by re-pressing.
Enhanced Surface Finish
- Eliminates surface irregularities
In powder metallurgy, surface irregularities may occur due to the packing and heating of powder particles. Sizing process aids in smoothing out these irregularities by applying external pressure.
- Reduces roughness
Sizing effectively reduces roughness by compacting the surface particles closer together. This leads to a more uniform and smooth finish for the part.
- Surface sealing
Moreover, sizing contributes to realize surface sealing of oil impregnated bushings. It compacts the surface to reduce porosity, which improves oil retention. This denser surface not only holds oil better, ensuring continuous lubrication, but also strengthens the part. Surface sealing is mostly applied to powder metallurgy oil-impregnated bearings.
Challenges in Sizing Process
Die Wear
Repeated exposure of the die to hard metal powders will increase die wear. And die wear can damage the tighten tolerances and surface quality of the final product.
Springback Effect
Springback occurs when a material returns to its original shape after the applied pressure is removed. It can cause parts to deviate from their intended dimensions and shape. Therefore, you may need additional post-sizing treatments or adjustments for this situation.
Material limitation
Sizing are not ideal for some metal powders. For instance, sinter hardened powder (FLC-4608) becomes very hard after sintering, often exceeding HRC 30 in hardness. Pressing these hard material can lead to dimensional inaccuracies and damage to the dies.
Equipment and Tools in Sizing Process
Sizing generally has two types: fully automatic and semi-automatic. They all employ mechanical presses or hydraulic presses.

- Full Automatic Sizing
Fully automatic sizing is suitable for small and complex parts. The main tools are follows:
- Receiving Tray
Receiving Tray align and organize small parts into the correct orientation before sizing.

- Robotic arm
Robotic arm is responsible for picking up parts from vibrating plate and placing them into the die, as well as removing the parts. This reduces human operational errors and increases throughput.
- Semi-automatic sizing
For larger parts or a low-volume order, manual methods works better. In this way, workers manually place powder metal parts into the die and take them out. The advantage of this method is that the cost is lower and it can be flexible for parts of different sizes. However, it has lower throughput.
In our practical applications, sizing offers many benefits, particularly in improving component tolerances. However, sizing isn’t ideal for all types of parts. It works well for processing a single dimension and struggles with multiple dimensions.
For parts with regular inner and outer diameters, sizing can effectively improve their precision. Yet, it is very challenging to perform sizing for special-shaped and irregular parts, such as gears.
BLUE is a leading powder metallurgy manufacturer in China, offering a wide range of standard powder metallurgy parts with no tooling fees. You can download our powder metalllurgy product list for free to select from. If you can’t find what you’re looking for, we also offer custom services.
FAQ
What is the Labor Cost for Sizing Process?
Workers handle about 10 to 15 parts per minute. In China, the monthly salary of an average worker is approximately $550 to $620. The labor cost for sizing a part is about $0.04 to $0.11. So, sizing is an economical way to achieve tighter component tolerances.
Are the Dies Used in Sizing the Same as Those in Compacting?
No.
The dies for sizing are not the same as those used in the compaction.
Compaction process dies have more complex shapes.
Sizing dies often corrects the size of a single dimension of the part. They are specifically designed to attain precise tolerances for parts.
Are Compacting Presses the same as Sizing Presses?
No.
Compacting presses operate at higher tonnages because they need to press the metal powders into a dense, coherent mass.
Sizing presses make small dimensional adjustments to the parts, so the force applied does not need to be as high.


