


Hardness testing is a method used to check how well a material can withstand being deformed. The Knoop hardness test uses an indenter that penetrates approximately half the depth of the vickers hardness test, making it suitable for brittle materials such as ceramics, thin plates and coatings.
Contents
What is the Knoop Hardness Test?
The Knoop hardness test, also called microhardness testing, is a microindentation technique used to measure the hardness of materials. This process is done by pressing a small, extended diamond indenter into the surface of a specimen with a light load applied. The technique was developed in 1939 by Frederick Knoop and his team at the National Bureau of Standards, hence the name. It is used instead of other methods because it can handle very small materials without causing serious damage.
The Working Principle
The principle of the Knoop hardness test is straight to the point and exact. The indenter is pressed into the material using a controlled load. This forms an indentation that is measured to calculate the hardness of the material.
What Is the Knoop Indenter?
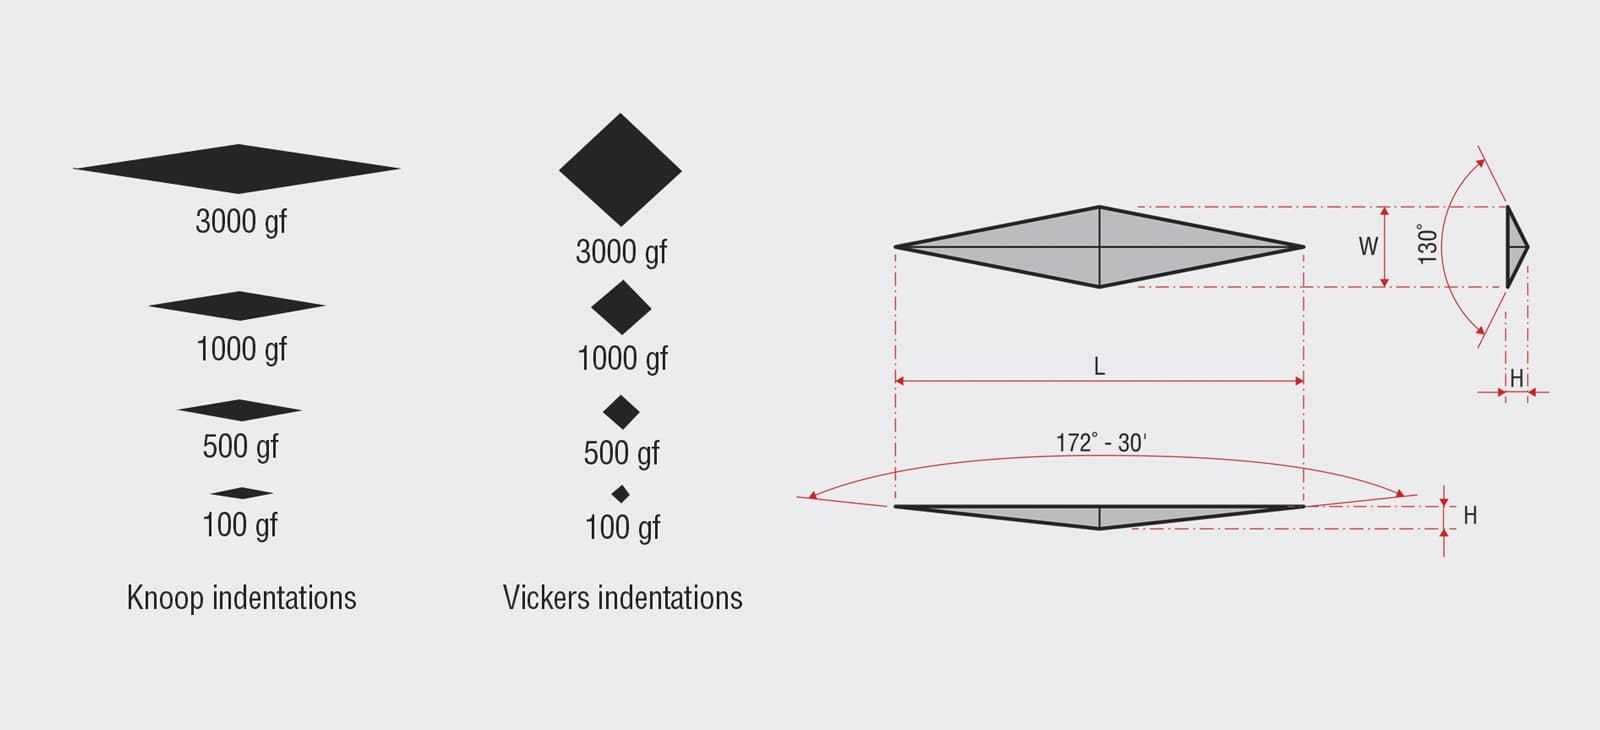
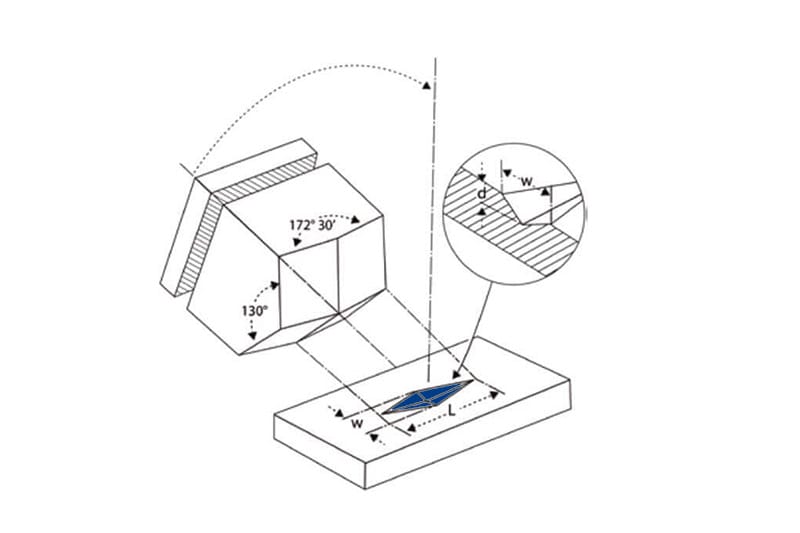
The Knoop indenter is in the form of a pyramidal diamond with the following features:
- The long and short diagonals have a length difference ratio of 7 to 1.
- There is an angle of 130° between the short sides and 172.5° between the long sides.
This elongated shape is what makes it perfect for measuring small features and thin coatings, because it reduces the penetration depth while making good use of the length of the impression.
Relationship Between Indentation and Hardness
After the test is done, a microscope is used to measure the length of the long diagonal of the indentation made. The Knoop Hardness Number (KHN) is then calculated using a specific formula, where hardness is inversely proportional to the area of the indentation. You will get to see an example as we progress.
Knoop Hardness Test Procedure
This procedure starts with preparing your sample, picking the right tools, then following through with indentation, measurement, and calculation.
Prepare Your Sample
Clean your sample properly, make sure it’s smooth, and place it in a way that it doesn’t shake during testing to avoid making mistakes in your measurements.
Pick Out the Needed Equipment
The equipment you’ll need for this procedure is: a microhardness testing machine, a scaled Knoop indenter, a microscope, and a system that allows you to control the load applied to avoid inaccurate results.
Start The Indentation Process
The load applied during the indentation normally weighs between 10 to 1,000 grams-force (gf), depending on the material and sample thickness.
After that, use your Knoop indenter to load the sample for approximately 10 to 15 seconds using the load you chose. Once the dwell time expires, release the load and check out the indentation with your precision microscope.
Take Measurements and Calculate the Hardness
While viewing the indentation with the microscope, take the measurement of the long diagonal, and write down the correct value in millimeters. Input those values into the Knoop formula and calculate the hardness of the material.
Applications of Knoop Hardness Test
The Knoop test is mostly used to measure the following:
Thin Coatings: It is used for testing thin surfaces like oxide layers and metal platings, like zinc plating, chrome plating.
Brittle materials:Suitable for ceramics, glass, carbides, and hard minerals where traditional indenters may cause cracking.
Micro-sized Parts – The Knoop Hardness Test is known for its specialization in handling very small-sized materials. This is why it is applicable in fields like biomedical engineering, manufacturing of semiconductors and developing instruments with high precision.
Advantages and Limitations
Advantages
- It causes minimal damage to the tested sample compared to other methods.
- It is ideal for measuring thin-layered films and coatings used on substrates without necessarily piercing the substrate.
- Measurements can be done repeatedly without challenges, as long as all procedures are followed accordingly.
Limitations
- The process depends on the nature of the surface, meaning that the sample surface must be smooth and polished to get accurate readings.
- This method takes a longer time to get done, unlike that of macrohardness tests.
- The indentation is measured by using only the length of the long diagonal, this might affect getting a correct reading when testing anisotropic materials like wood.
- Though it is ideal for delicate materials, this method cannot be used to test soft samples like rubber.
Difference Between Knoop and Vickers Hardness Tests
Below is a detailed comparison of knoop and vickers hardness tests.
| Feature | Knoop | Vickers |
|---|---|---|
| Shape of the indenter | A diamond-shaped pyramid that is elongated | A diamond shape that is well proportioned |
| Indentation depth | A shallow penetration (about half of the Vickers) | A deeper penetration |
| Materials best used on | Small parts, thin layers, and brittle materials | Bulky materials with uniform shape and size throughout |
| Measurements taken | Uses only the long diagonal | Uses both long and short diagonals |
FAQ
1. Does The Thickness of The Sample Matter?
Yes, according to ASTM, the sample thickness should be at least ten times the depth of indentation, while ISO says it should be a third of the measured diagonal length. If the condition is not met, the readings will be erroneous.
2. Is The Use of The Knoop Method Dependent on The Diagonal Length?
Yes, if the length of the long diagonal is anything less than 20 micrometers (20 μm), then you cannot go ahead with the Knoop hardness test. Your readings and calculations will be inaccurate.
3. Is There a Load Range for Knoop Hardness Test?
Yes, there is a load range for this method. ASTM and ISO say it ranges between 1 gram-force (1 gf) to 2 kilograms-force (2 kgf). This means that it is only used for testing low loads