In materials science, hardness testing plays a importantl role in quality analysis and control, especially regarding stress and wear. It’s an essential way to evaluate materials hardness and is widely used across industries ranging from automotive and construction to biomedical engineering and research. This article explores the core principles, testing methods, equipment, and procedures involved in hardness testing.”

Contents
What is Hardness Testing?
Hardness testing is a process that checks the ability of a material to resist deformation, especially when indented permanently on the surface by a harder material. It measures the depth or size of the mark left by a hard indenter under a standard load. In simple terms, it is a method that helps to determine the hardness level of a material.
Hardness testing traces its roots to 1812, when Friedrich Mohs introduced a ten-point scratch scale that ranks minerals from talc (1) to diamond (10). Modern instrumented methods followed: Brinell (1900 ball indentation), Shore Scleroscope (1907 rebound), Rockwell (1919 depth), Vickers (1921 diamond pyramid), and Knoop (1939 micro-indentation).
Hardness Testing Methods
There are different types of hardness testing methods categorized either as dynamic testing methods or static testing methods. Let’s see a few commonly used ones:
Rockwell Hardness Test (HR)
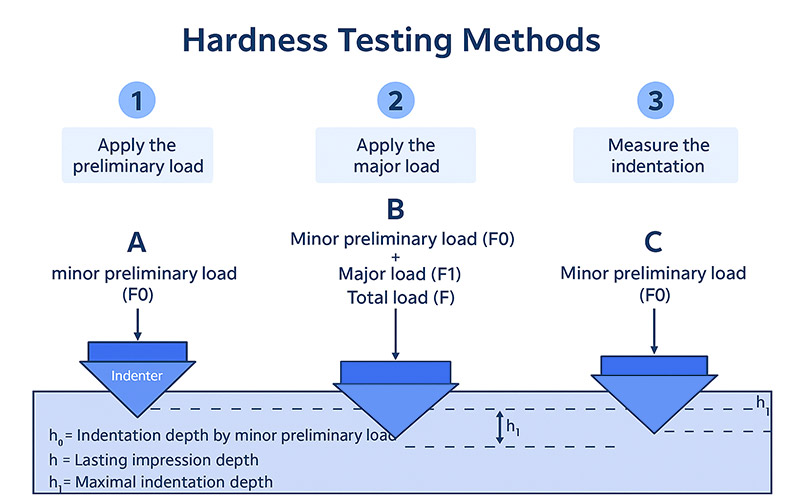
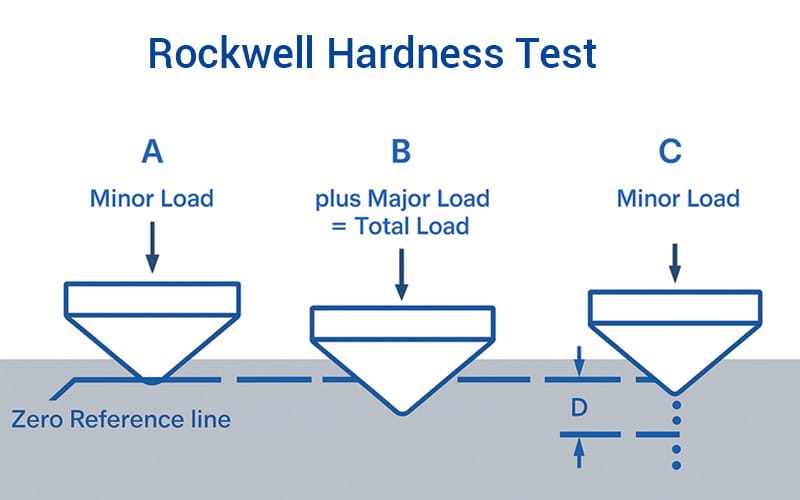
Rockwell hardness testing measures a material’s hardness by pressing a diamond cone into its surface under a specific load and then measuring the depth of the resulting indentation. This method is fast, straightforward, and stress-free. It is mostly useful in steel and alloy testing for quality control.

Brinell Hardness Test (HB)
Unlike the Rockwell method, the Brinell hardness test employs a steel or carbide ball to create an indentation on the material surface, which is then measured to determine hardness. It also applies a load but it measures the diameter of the mark made to gauge the hardness of the material. The unique thing about this method is that it is very potent for testing materials that have uneven and rough surfaces. It is mostly applied in testing castings and forgings.
Vickers Hardness Test (HV)
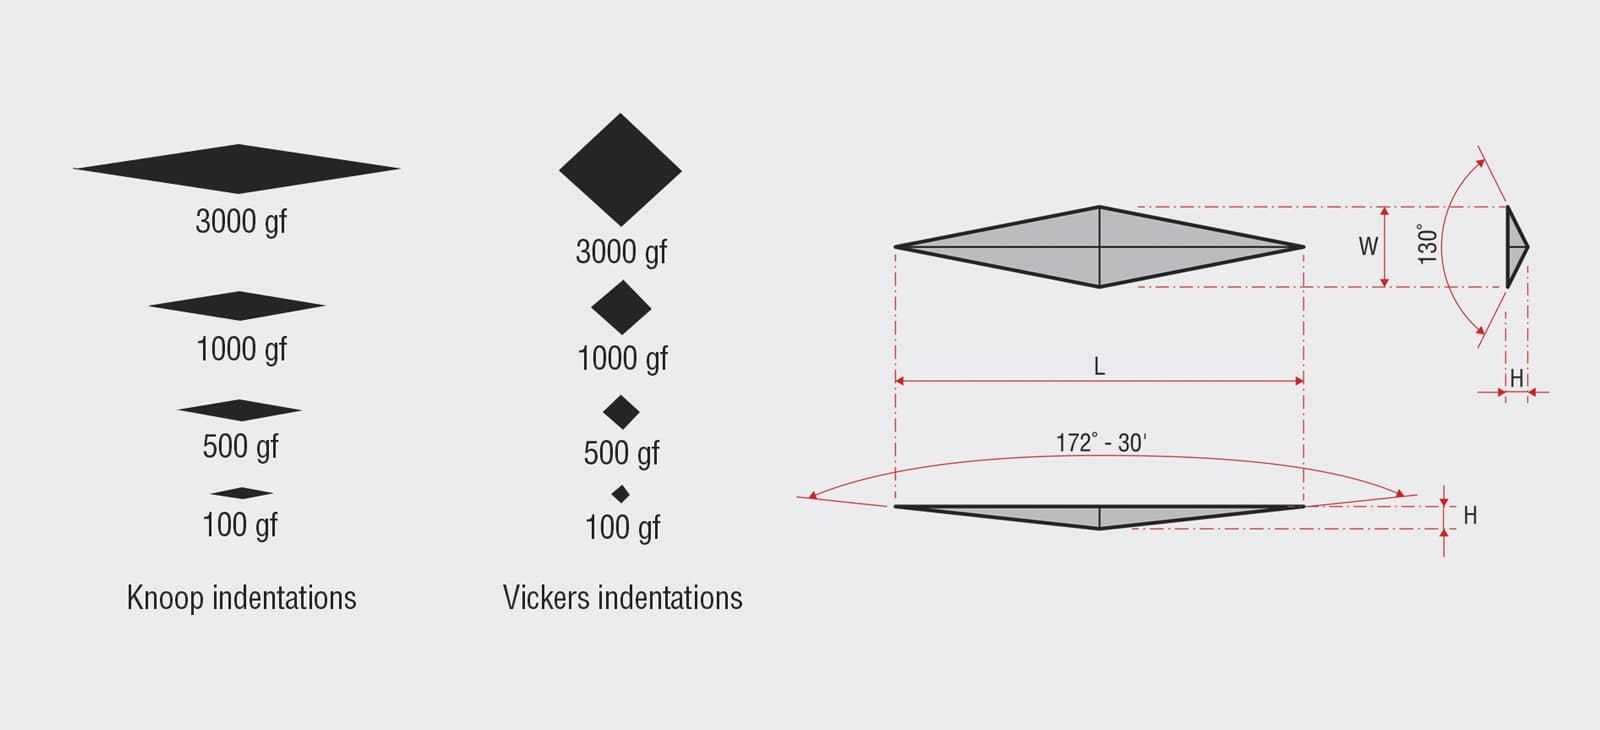
Unlike the previously mentioned methods that measure the depth and diameter of indentation, Vickers hardness testing method is different. It measures the length of the diagonals of the mark made by penetrating the test sample with a 136° diamond pyramid. However, one thing is similar, it also applies a fixed load. Vickers method is unique because it can be used to test a wide variety of materials like ceramics, metals, and composites.
Mohs Hardness Test
As earlier mentioned, Mohs hardness test gauges the hardness of a material by its ability to scratch another. It is a simple process that applies qualitative procedures and is suitable for testing minerals and samples used for geological processes.
Knoop Hardness Test
Knoop hardness test is known for its uniqueness in testing small and tiny materials like thin coatings and films. The loads applied are small, and the indenter that pierces the test sample is slender and lengthy with a fine tip. The measurement is done by only concentrating on the length of the long diagonals.
Hardness Test Equipment
Every specific hardness testing method have their own unique set up, however, most of the commonly used methods generally consist of these four important equipment:
- An indenter that is used to penetrate the test material to make the mark or indentation (steel, diamond, or carbide ball).
- A system that applies the needed load or force.
- A means of observing and measuring the made mark or indentation, could be a scale, or microscope, in some cases it is automated.
- Naturally, every machine needs to be calibrated from time to time for optimal operation, same with the hardness testing equipment.

Hardness Test Procedure
Although procedures vary slightly by method, general steps include:
Sample Preparation
The test surface must be smooth, clean, and free from scale or coatings unless testing coated surfaces is the goal.
Applying Load
The indenter is pressed into the surface under a specified load for a certain duration.
Measuring Indentation
Either depth or diameter/diagonal of the indentation is measured using optical or electronic tools.
Calculating Hardness
The machine or operator computes a hardness value based on standard formulas.
Applications of Hardness Testing
- The process of checking and comparing hardness levels of materials for proper selection based on their application needs.
- Verifying heat-treatment processes by confirming their effectiveness, for example, processes like tempering or quenching
- Ensuring and controlling the quality of production in manufacturing processes by checking for errors or defects.
- Checking surface treatment by assessing the hardness of coatings, electroplating, or nitriding.
Advantages and Limitations of Each Method
| Method | Advantages | Limitations |
|---|---|---|
| Rockwell | Quick and easy to use | Limited for very thin materials |
| Brinell | Ideal for rough surfaces | Less precise, large indentation |
| Vickers | Precise, universal | Time-consuming |
| Mohs | Simple, field-friendly | Subjective, qualitative |
| Knoop | High resolution for thin layers | Requires skill and clean surfaces |
FAQ
Why is the Vickers Hardness Test Preferred for Powder Metallurgy Parts?
Powder metallurgy parts retain a certain level of residual porosity, and a large-radius indenter can strike a pore and give a misleadingly low reading. The Vickers method uses a diamond pyramid that leaves a very small indentation, so the measurement can be placed entirely within a fully dense zone. The low test load therefore records the intrinsic hardness of the metallic matrix rather than the bulk “apparent” hardness of the porous structure. For sintered metals, HV5, HV10, and HV20 are the standard recommended load ranges.
Can Hardness Tests Damage the Material?
That depends on the hardness testing method. This is because hardness testing methods are categorized into destructive hardness tests (e.g. Rockwell, Brinell, Vickers)) and non-destructive hardness tests (e.g. portable Leeb hardness testers). Destructive hardness testing leaves permanent damage to the test material after indentation, while non-destructive hardness testing leaves a small deformation which doesn’t affect the material or its properties.
Is There a Hardness Testing Standard?
Yes, the hardness tests align with different standards like ASTM and ISO, for example, ASTM E10 and ISO 6506 both guide the Brinell hardness test, while ASTM E18 and ISO 6508 are for Rockwell hardness test.
What Are the Sources of Error to Check When Conducting Hardness Tests?
Error during the hardness tests can come from different sources, from the operator, to the test material, the equipment, and even the test process itself, to mention a few;
- When the surface of the test sample is not properly prepared for the test.
- Inconsistent load application.
- Calibration drift due to equipment error.
- Using an indenter that is damaged, worn, or not properly aligned.
- Human error in reading results.
What Is the Difference Between Dynamic Hardness Testing and Static Hardness Testing Methods?
Dynamic hardness testing methods go through a process where the load is applied suddenly with a quick increase in the load. The rebound velocity is measured (converted to hardness number) for example Leeb, and Shore Scleroscope hardness tests. On the other hand, static hardness testing methods use a constant load or a gradually increased load. They measure the indentation depth instead, like the Brinell, Vickers, and Knoop tests.


